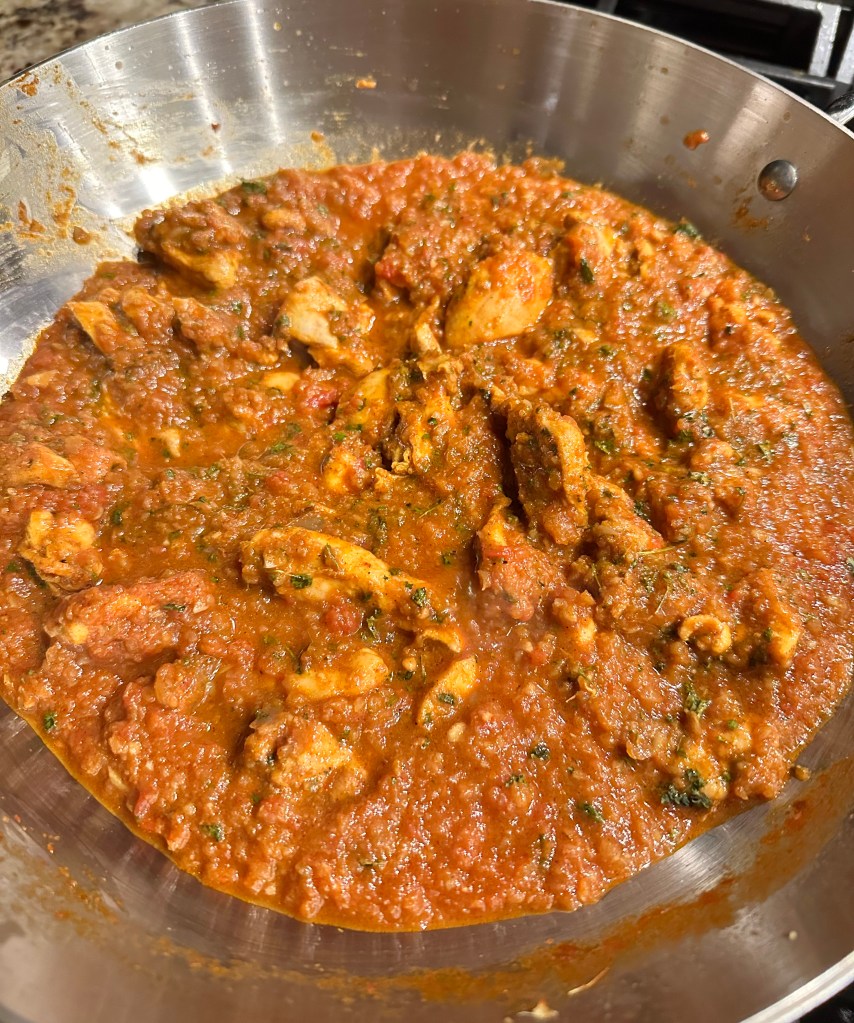
I absolutely love Indian food, as it has so many different spices and there are so many regional variations in the cuisine. This dish is prepared more in a southern style as it has coconut milk. Experiment with the level of heat, by reducing the number of chilies or by seeding them.
When working with chilies it is important to remember to wash your hands with soap and water, before you continue cooking. The heat and the oils are in the seeds and even more so in the inner membrane, so you can remove these to reduce the heat, but you need to use care as it’s easy to forget and rub your eyes and I can assure you if you do this and get these irritant oils in your eyes, you won’t forget a second time. I speak from personal experience!
This is definitely one of my favorite curries and I like it because it can be made relatively quickly. The key to this dish is to have all of your ingredients arranged, so you aren’t scrambling around the kitchen trying to find things once you have begun cooking. I find this works very well with a wok or karahi, but feel free to use what suits you.
Ingredients:
1 lb Chicken Breasts or Thighs, cut into 1 ½ inch cubes
3 Tbsp Vegetable oil
4 cloves of Garlic, finely chopped, crushed or mashed with a mortar and pestle
2 inch pieces of fresh Ginger root, finely chopped, grated or mashed with a mortar and pestle
1 large Onion, sliced very thinly. A mandoline is very handy for this.
2-4 Thai Chilies, seeds removed if you don’t want it too hot.
1 tsp of Turmeric powder
2 Tbsp of prepared Curry Paste. Pataks is very good
1 tsp Salt
2 tsp of Garam Masala
1 red Pepper, cut into cubes to match the size of chicken pieces
10 cherry Tomatoes cut in half
½ cup of Coconut Milk, more if needed once you begin cooking
Fresh Coriander, chopped. About ¼ cup.
Preparation:
Heat your wok/pan and then add garlic, ginger and sauté for about 1 minute, add your chilies, and do not let it brown or burn. Add your onion and cook until the onion is well caramelized.
Add your turmeric; curry paste and quickly sauté, again not letting it brown. Now add the chicken and sauté just until the chicken has turned white.
Add the tomatoes, red pepper and garam masala, salt and stir well. Add the coconut milk and let it simmer for approx. 10 minutes, or until the chicken is fully cooked. If the mixture becomes too thick add a little bit of the coconut milk to keep a medium thickness sauce.
Just before serving stir in the fresh coriander and then serve immediately with basmati rice.
I want to share these two wonderful Persian recipes. When I bought my first house, I was lucky enough to live next to some fantastic neighbors with whom I remain close friends.
And, even more lucky for me, my neighbor’s mother was a fabulous cook and made the best Persian food and frankly the first Persian food I had ever tasted. I am always surprised with how little people know about Persian food, when it is one of the great cuisines of the world.
Here are some of her recipes and I hope she will share some more with us later in the year, so we can all expand our understanding of this unique and interesting food.
Kebabs
This is so basic and yet so wonderful. The key is to make sure that you marinate the meat for at least 24 hours and 48 hours is better. This recipe is made with chicken, but you could use lamb or beef also.
Ingredients:
Chicken Thighs
One bunch Green Onions, about 6
3 Lemons, juiced
½ cup Olive Oil
10 leaves fresh Mint
Salt and Pepper
Preparation:
Combine all ingredients, except chicken, in a food processor and pulse until well blended. Put the chicken into a deep-dish baking pan or a plastic freezer bag and cover in the marinade.
Allow chicken to marinade for 24 to 48 hours and then grill over medium coals until completely cooked and crispy on the outside.
Serve with Persian or Basmati rice and Salad e’ Shirazee.
Salad e’ Shirazee
This is a refreshing salad from Persia. My neighbor’s mother, as mentioned, was a wonderful cook and she offered this as a personal recipe, which was reflective of her home. This is refreshing and wonderful when served with kebabs.
Ingredients:
4 pickling Cucumbers
4 Cherry Tomatoes
2-3 Tbsp Extra Virgin Olive Oil
1 Lemon, juiced
4 Basil leaves
8 Mint leaves
4 Radish leaves
1 Chive stalk
Preparation:
Chop all ingredients and transfer to a bowl. Salt and pepper to taste, then add olive oil and lemon as a dressing. Chill for one hour prior to serving.
I first had this dish in Amsterdam at a small Dutch restaurant off one of the canals in the Jordaan. This is a quaint area of canals, old homes, wonderful shops and brown bars.
Kip in Dutch means chicken and grand mere is grandmother, so hence the name Grandmother’s Chicken. This is simple and really good on a cold blustery evening and is well matched when served with new potatoes, green beans and a cold Dutch beer.
Ingredients:
4 Chicken Breasts, boneless and trimmed of all fat, dusted in flour
½ lb of Bacon, chopped into 1 inch pieces
1 medium Onion, sliced thinly
½ lb of Mushrooms, sliced
1 cup of low sodium Chicken Broth
2 Tbsp Butter
Salt, freshly ground Black Pepper to taste
Parsley, chopped
Preparation:
Render down the bacon and then remove from the pan and set aside. Now add the onion and caramelize in the bacon fat. Add the chicken, salt and pepper and brown completely.
Transfer to 350 degree oven and bake until cooked through, then remove the chicken to a cutting board or plate and tent it with aluminum foil.
Now add the broth, bacon and mushrooms into the pan and cook until the mushrooms are tender and the sauce is reduced by half. Reduce the heat to a simmer, add the butter and whisk into the sauce.Pour sauce over the chicken, sprinkle with parsley and serve with boiled new potatoes, vegetables and hearty bread.
I was asked to post this recipe by a friend who enjoyed it at my home and wanted to make it himself This is a very simple dish to prepare and is perfect with a salad to create a full meal or as a side to round out a meal.
It is a convenient way to quickly throw together a meal. Basically it is a version of a traditional quiche, but with different ingredients than the typical French treatment.
Ingredients
1 Piecrust, either home made or store bought
8 oz of Broccoli florets, cut into 1-inch pieces
¾ cup and 2 Tbsp of Heavy Cream, or Whipping Cream
4 Eggs
5 oz of Blue Cheese, Pt Reyes Blue, Maytag Blue, or Stilton, cubed into ½ inch pieces
Salt and pepper to taste
Parchment Paper
Dried beans, approx 2 cups
Preparation:
Begin by blind baking the crust. Preheat the oven to 400 degrees, use a fork to gently prick the crust on the bottom and on the sides.
Cut a piece of parchment paper so it overlaps the crust slightly and lay it onto the unbaked crust, and fill with dried beans. Push them so you have more beans on the sides and less in the middle. Then bake for 10-15 minutes.
After baking, remove the crust and lift of the parchment paper and allow the crust to cool. The beans can be stored and reused. They will be hot when they come out, so handle with care.
Set the oven to 375 degrees. Quickly blanch the broccoli in boiling water, for maybe 2-3 minutes max and then shock in an ice water bath. Drain the broccoli while you prepare the rest of the ingredients. Beat the eggs together with the cream and salt and pepper the mixture.
Arrange the broccoli in the piecrust and intersperse with the cubed blue cheese. Once it is fully packed, gently pour the egg mixture, until it just reaches the top of the crust. Do not overfill, or it will spill over during cooking.
Put tart into the oven and bake for 25-35 minutes. You can start checking for doneness after 25 minutes by looking at the surface and also by gently shaking the tart. When it is just set, remove and allow to cool before serving. After cooling, it will keep in the refrigerator, but I think it is best the day it is made.
Serve with a salad or as part of a mixed dish meal.
This is one of my favorite sides to have with either chili or fried chicken. It is great and quick. You can adjust the heat by seeding the jalapenos or not, as desired.
You may bake this as individual muffins or as a pan of cornbread. Follow the directions for the corn bread mix, but probably it’s a good idea to grease the pans with some vegetable oil.Ingredients:
2 boxes of Corn Bread mix, follow the instructions on the box.
1 can of yellow Corn, drained well
Jalapenos to taste, about 1/4 to 1/2 cup chopped. If you are not seeding the jalapeños, I would recommend 1/4 cup.
Preparation:
Mix together the corn bread mixture omitting ¼ of the wet ingredients (in other words, if the recipe calls for 1 cup of milk, then only use ¾ of a cup).
Then mix in the corn and jalapenos and bake as recommended. You may need to increase your baking time slightly, due to the whole corn in the mix.
This is one of many chili recipes I have tested, and I have refined it until I believe it’s just right. It’s made with chicken, but could just as easily be made with any meat you desire. It is also really good with beef.
I like it because it is different, and doesn’t taste like your “run of the mill” chili. As you will notice, it has no beans, and rightfully so. Real chili does not have beans, just meat, as any Texan will tell you. Of course, if you’re not from Texas, you can feel free to add beans.
Ingredients:
1 lb. Chicken Thighs, cubed or 1 lb cubed Beef
4 cloves Garlic chopped
1 large Onion, chopped
1 large Red Pepper, chopped
3 Tbsp. Vegetable Oil
2-4 Tbsp. Chili Powder
1 Tbsp. Ground Cumin, only if you have not made your own chili powder.
1 Tsp. Ground Coriander
2 Tbsp. Worcestershire Sauce
1 can of Tomato Paste
¼ cup Cider Vinegar
1 bottle Beer
2 Tbsp. Tequila, optional
1 cup of strong chicken stock or beef stock if using beef.
Preparation:
Heat the oil in a heavy saucepan, add the onions and peppers, then the garlic and finally the dry spices. stir well and add meat and continue until just slightly browned. Add Worcestershire, vinegar, beer, tequila, Tomato paste and stock.
Cook over a slow simmer for 2 to 3 hours. Serve with corn tortillas, biscuits or Jalapeno Sweet Corn Bread.
By chili powder, I mean a powder to make chili or add a Mexican flavor to chicken, a roast or blackened dishes. Really, the options are endless. This is not a super spicy cayenne type product.
I have found that trying to buy chili powder is expensive and unless you buy the same type every time, you get all sorts of different mixes and the flavor is completely different.
In addition, most of them are ground in bulk, so they are not fresh and the flavor has long since faded. A particular challenging spice is cumin. Once ground it loses its fruitiness and brightness very quickly and starts to take on an earthly flavor. It is one to the spices that I always grind fresh.
I think making your own is much preferable and you can adjust the powder to your own taste. You will need a spice grinder, which is just a small coffee grinder, but one reserved just for grinding spices. I can promise you that you will not want to use the same one for coffee and spices! Krups makes a good one, which is sturdy and not expensive.
You will need to buy the dried chilies and I have the perfect place, The Spice House in Chicago. www.thespicehouse.com
Ingredients:
4 oz whole Guajillo Chili Peppers
4 oz of Ancho Chili Peppers
2 oz Pasilla Negro Chili Peppers
4 Tbsp freshly ground whole cumin seeds, just order a 4oz bag
2 Morita Red Chipotle Chilis, just order a 1 oz bag
Preparation:
Once you have assembled all of the chilies. you will need to cut off the hard stems, as you do not want them in the chili powder. A good pair of kitchen scissors is perfect for this. Once the chilies have all been prepped. Add the Guajillo, Ancho, Pasilla and Chipotle into a large food processor and grind them thoroughly.
Then you will transfer the ground chilies in small batches to the spice grinder and grind them down to a powder. Finally, grind the cumin seeds until they are completely powdered.
Now just combine all of the ingredients into an airtight jar and you have your own chili powder. Remember, you can adjust the heat by adding in Chilies de Arbol or more Moritas.
It really doesn’t take that long once all of the ingredients are assembled and remember you are making a lot of chili powder, so it will last you quite a while.
Note: I have not included garlic powder or salt, as almost all other prepared chili powders do, so you will need to add fresh garlic and of course salt to whatever dish you are making. I leave out the garlic powder, because I find it bitter and that it tastes too processed. I leave out the salt, because I want to control the level of salt without having to limit how I use the chili powder.
This is a dish that I first tried in Sweden at a traditional Swedish Christmas table. Leading up to Christmas, restaurants and homes all over Sweden create these amazing tables filled with food of every description; however, this is one dish that you will find on almost every one. I enjoyed it so much that I asked for the recipe and my host graciously offered her personal recipe.
It is rich, indulgent and just fabulous as a side dish. I know that many people are not fond of anchovies, but it honestly doesn’t taste the same without them. Since it’s a cream base, the flavor is wonderful and it’s not fishy, so no one will even know there are anchovies in it, unless you tell them.
Ingredients:
2 ¼ lbs. of Potatoes, peeled and thinly sliced. This is the perfect time to get out the mandoline. I particularly like Yukon Gold for this recipe
2 large Onions, thinly sliced
2 Tbsp. of Butter
150 gr. tin of Anchovies in oil
13.5oz. of Cream
2 Tbsp. of Breadcrumbs
Preparation:
In a shallow oven proof-baking dish, arrange alternating layers of potatoes, onions, anchovies and butter.
After completing the layering, pour the cream over the dish, and then sprinkle the breadcrumbs over and cover with aluminum foil and put into the preheated 350-degree oven for 35-45 minutes. Then remove the foil, and continue cooking and browning for 10 additional minutes.
Allow to set uncovered for 5 to 10 min. and serve.
So rainy here today, so time to bake. Here’s a great one to bring the holidays into the house. These cookies are addictive and make the house smell wonderful.
Ingredients:
12 Tbsp unsalted Butter (3/4 cup)
1 1/4 cup of white Sugar
1/4 cup Molasses
1 large Egg
2 tsp Baking Soda
2 cups AP Flour
1/2 tsp ground Cloves
1/2 tsp ground Ginger
1/4 tsp ground Nutmeg
1 tsp ground Cinnamon
1/2 tsp Salt
Powdered sugar for dusting
Preparation:
Preheat the oven to 375, and take out two non stick cookie sheets. You can also use greased parchment if you do not have non stick cookie sheets.
Melt butter and pour into mixer and let cool slightly, add 1 cup sugar, molasses, egg and beat well.
Sift together dry ingredients and add into butter mixture and blend well.
Cover bowl and put in fridge for 15 minutes
Put remaining 1/4 cup of sugar on plate. Scoop out dough by tablespoon and roll into 1 inch ball and roll in sugar and place on sheet, 2 inches apart and bake for 8 minutes for chewy and 10 minutes for crispy.
Dust with powdered sugar, while they are still hot.
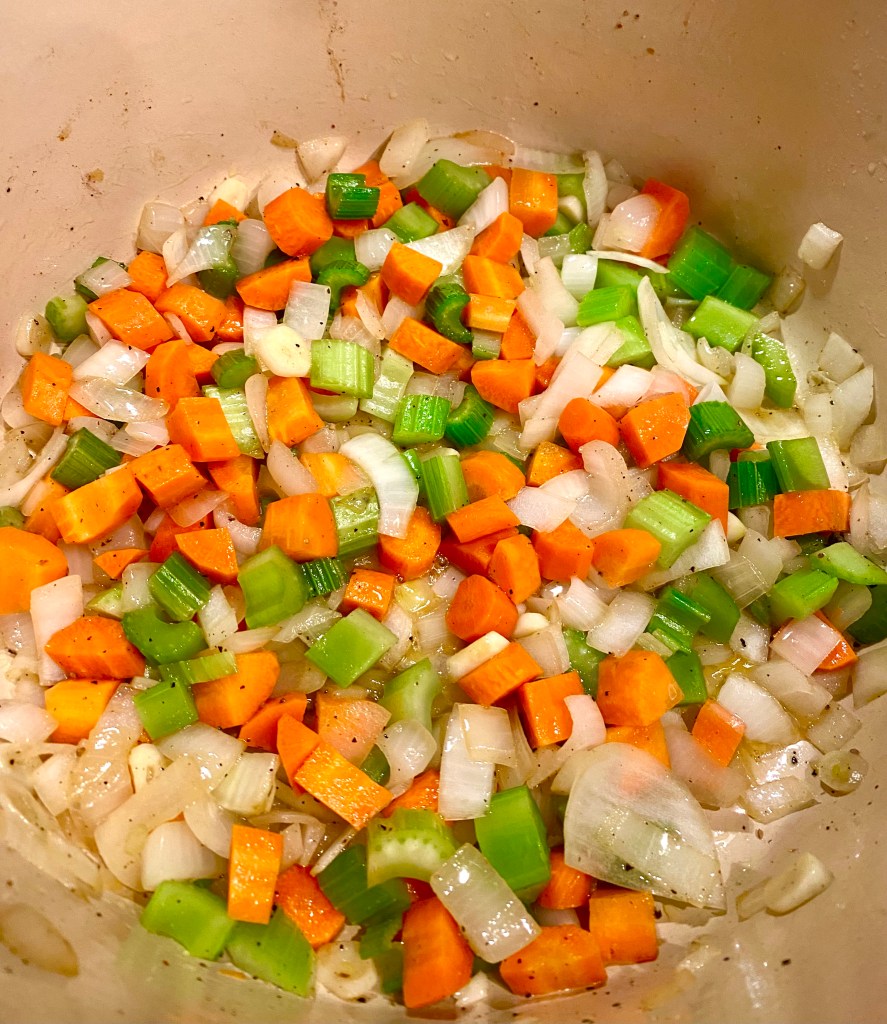
One of the most important concepts on cooking is the mirepoix, the Cajun version “the Trinity”. Or as the Italians refer to it, the battuto which eventually becomes a soffritto once it is cooked. This combination of basic ingredients is the base for almost all French, Italian, Spanish and Creole and Cajun dishes. Below is the mirepoix.
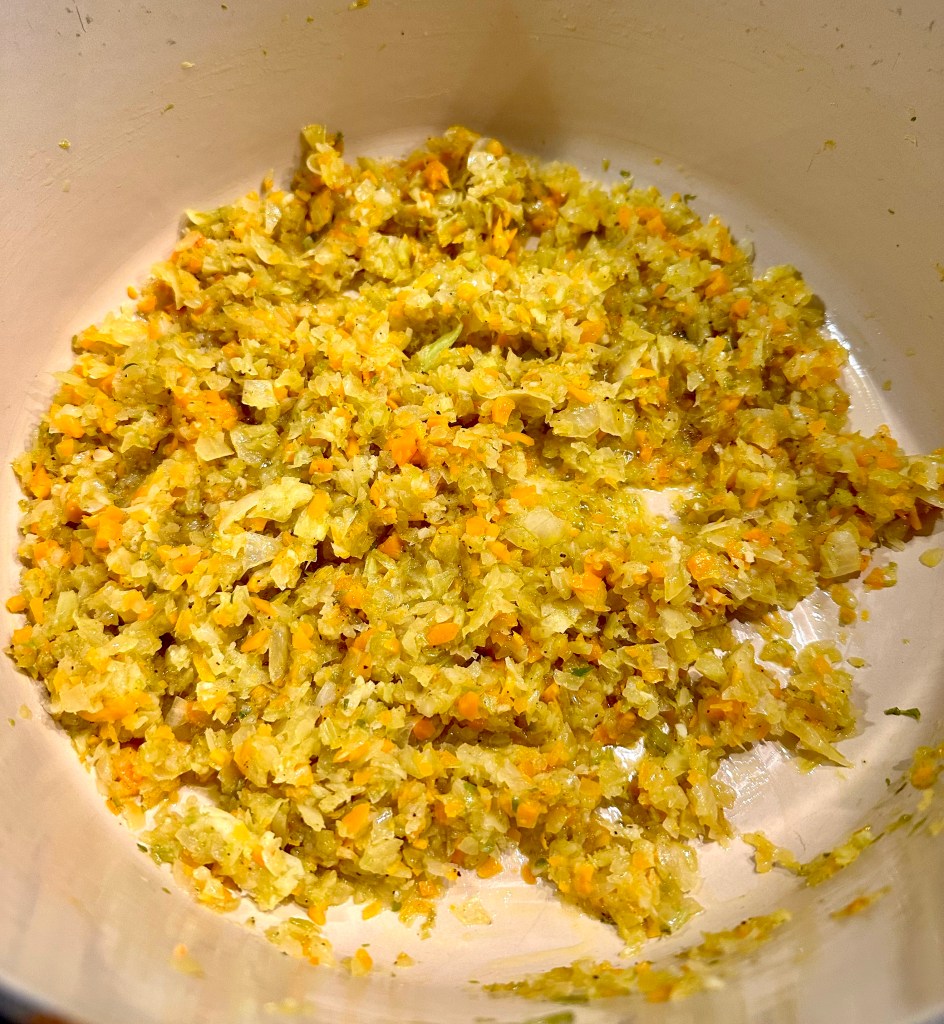
A battuto after cooking and so it transforms into a soffrittto.
Mirepoix: (French) Carrot Celery Onion
Trinity: (Cajun and Creole) Celery Onion Green Pepper
Battuto or Soffritto: (Italian and Spanish) Onion Celery Carrot
If you learn to make these well, you are on track to really improving your cooking and you have the base for almost all dishes.
Here are a few tips to prepare them properly:
Try and chop the ingredients into equal size pieces. Think the size of a small pea as the maximum size. No one wants to bite into a big chunk of vegetable in the mirepoix, it’s all about the blending of the flavors.
Remember to choose your fat/oil based upon the final taste you want. Extra Virgin Olive Oil (EVO) is not always the best choice as it can impart an herbaceous and green note.
Butter can sometimes be heavy. When in doubt, you will never go wrong with vegetable oil. Cold pressed only.
Sauté them slowly to allow them to “sweat” in the pan. You don’t want to brown or burn them. Once you make these a few times, you will notice how the smell changes when they are done.
Remember, cooking is all about layering the flavors and allowing them to come into their own.